4 Sourdough starter types
In this chapter of the book we will have a closer look at different sourdough starter types, and their respective traits and usage. They are mostly characterized by their hydration level, and this will provide a trade-off between acidity, volume increase and the gluten level of your flour.
4.1 Introduction🔗
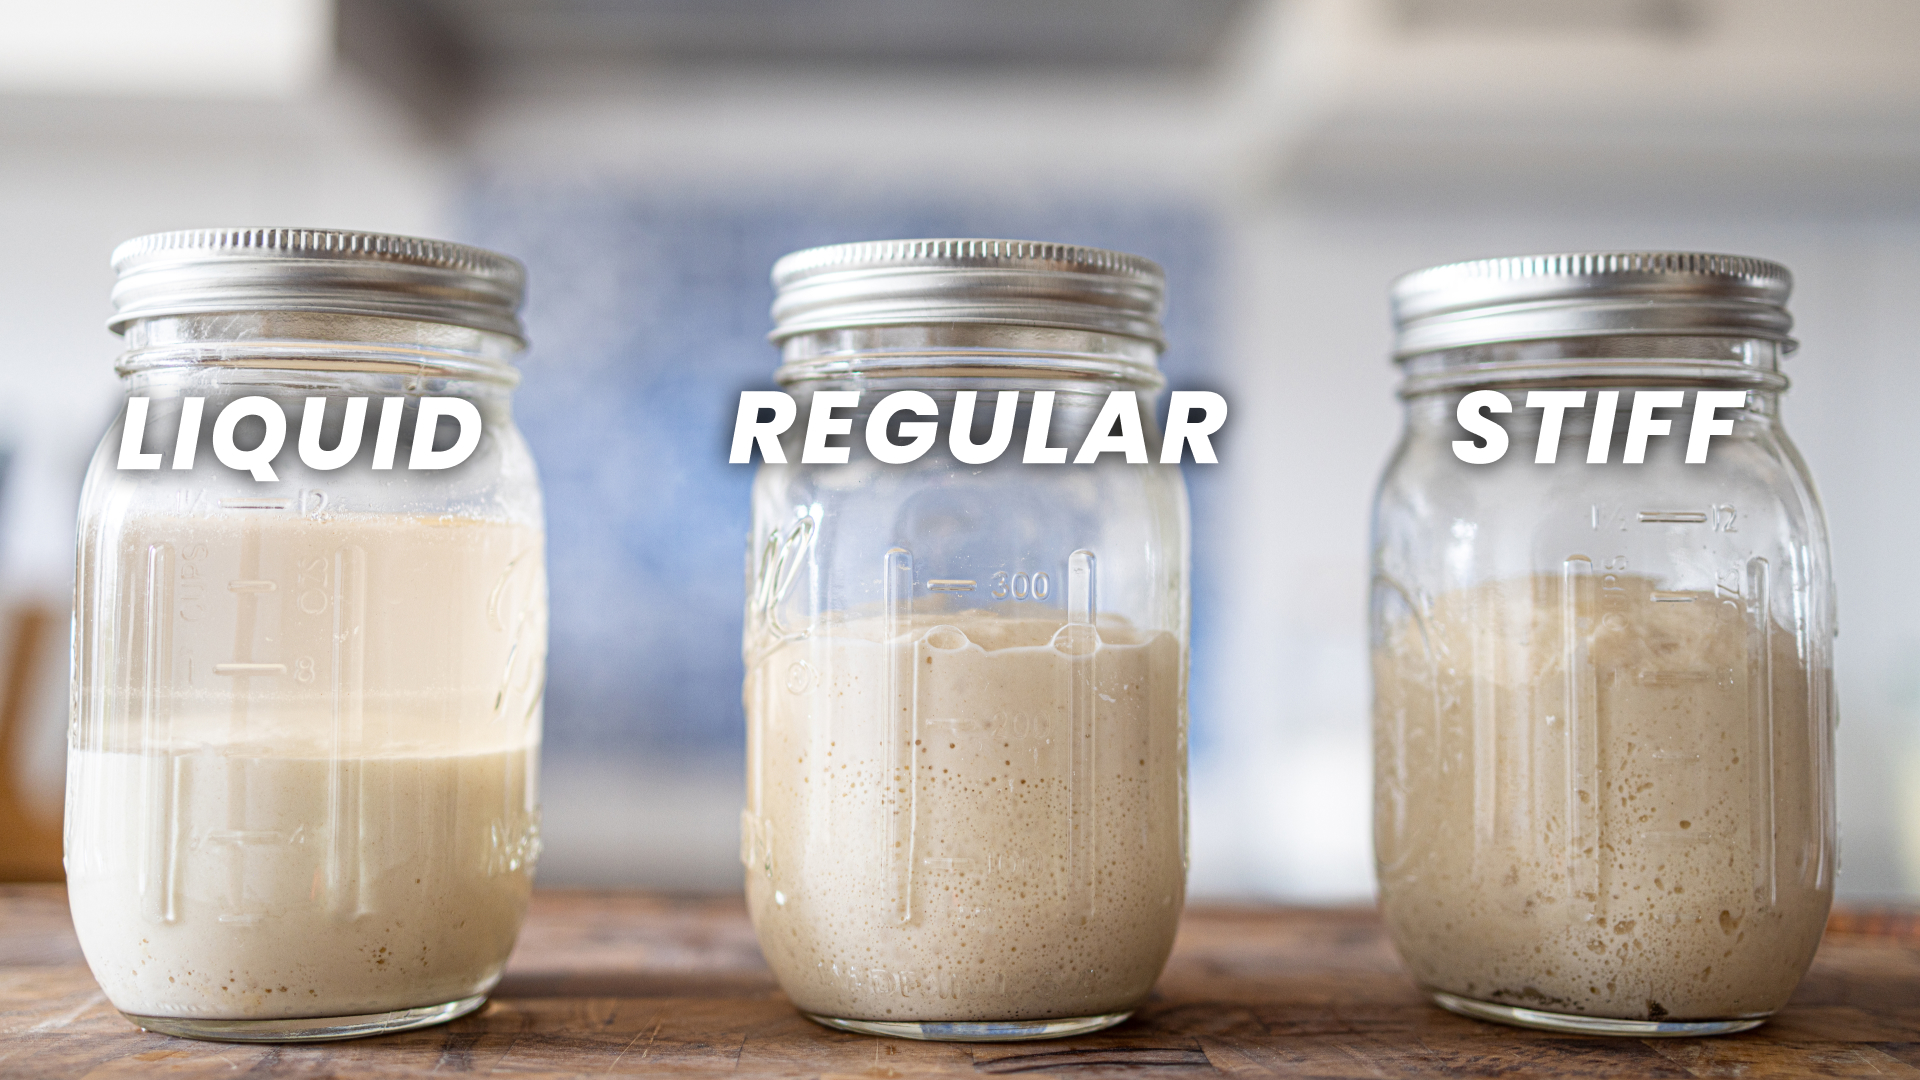
Depending on the flour you have at hand, the type of starter changes. With more bacterial activity you have more gluten consumption of your microbes. So if you want to bake a free standing loaf, you need a flour with more gluten. The more gluten you have, the more of it can be broken down whilst still maintaining dough integrity. If you live in a country where the climate to grow wheat isn’t ideal and you only have weaker flours, then a stiff sourdough starter could be advised. The stiff sourdough starter will improve yeast activity and reduce bacterial activity. If you are a chaser of a very sour bread and have a very strong wheat flour then you can try to play with a liquid sourdough starter. The key difference between all of the starters is how much water is used in the starter. The regular starter has a 1:1 relationship of flour to water. The liquid starter has a 5:1 water-to-flour ratio, and the stiff starter has half as much water as flour, as summarized in Table 4.1.
|
Activity
|
||||
| Starter type | Hydration (%) | Flour type | Yeast | Bacterial |
| Regular | 100 | Strong wheat | Balanced | Balanced |
| Liquid | 500 | Very strong wheat | Minimal | High |
| Stiff | 50–60 | All wheat | High | Low |
You can change your starter type by just adjusting the feeding ratio of how much flour and water you use. I frequently change my starter type from regular to liquid and then back to a stiff starter. After changing the environment of your microbes, apply feedings at the same ratio over a couple of days so that they can adapt to the new environment. I typically see changes after a single feeding, but I recommend 2 to 3 feedings, one feeding per day, to see a stronger effect.
Your dough is generally just a big sourdough starter. So your starter is going to adapt and regrow inside of your main dough. But you can influence the properties that your starter carries over to your main dough. If you have more bacterial fermentation, then your dough will also have slightly more bacterial fermentation. If you have more yeast fermentation, then your main dough will have slightly more yeast fermentation. This is important to know when you are working with a more mature unfed starter.
Let’s say your starter had last been fed 48 hours ago. Chances are that your bacteria are very active while the yeast could be dormant. In such a case you can skip feeding your starter before making another dough. Just use a very tiny amount of starter. For 1 kg of flour I would take around 10 g of starter (1 % in terms of baker’s math). If my starter is very young and had just been fed 6 to 8 hours ago I might end up going up to 20 % of starter. As mentioned earlier, remember that your dough is nothing else other than a big starter. It will tremendously help you to figure out your best next steps.
When using such a low inoculation rate (1 %), you need to use stronger flour when making wheat-based doughs. Your flour naturally breaks down due to enzymatic activity. It might take 24 hours for the starter to re-grow inside of your bread dough. At the same time, the enzymatic activity might have caused your gluten to degrade significantly. While this is okay when looking at your starter, your wheat-based dough will flatten out during baking and no longer have the typical characteristics (fluffy crumb structure). A stronger flour with more gluten is thus advised. It allows for a longer fermentation before most gluten is broken down.
4.2 Regular starter🔗
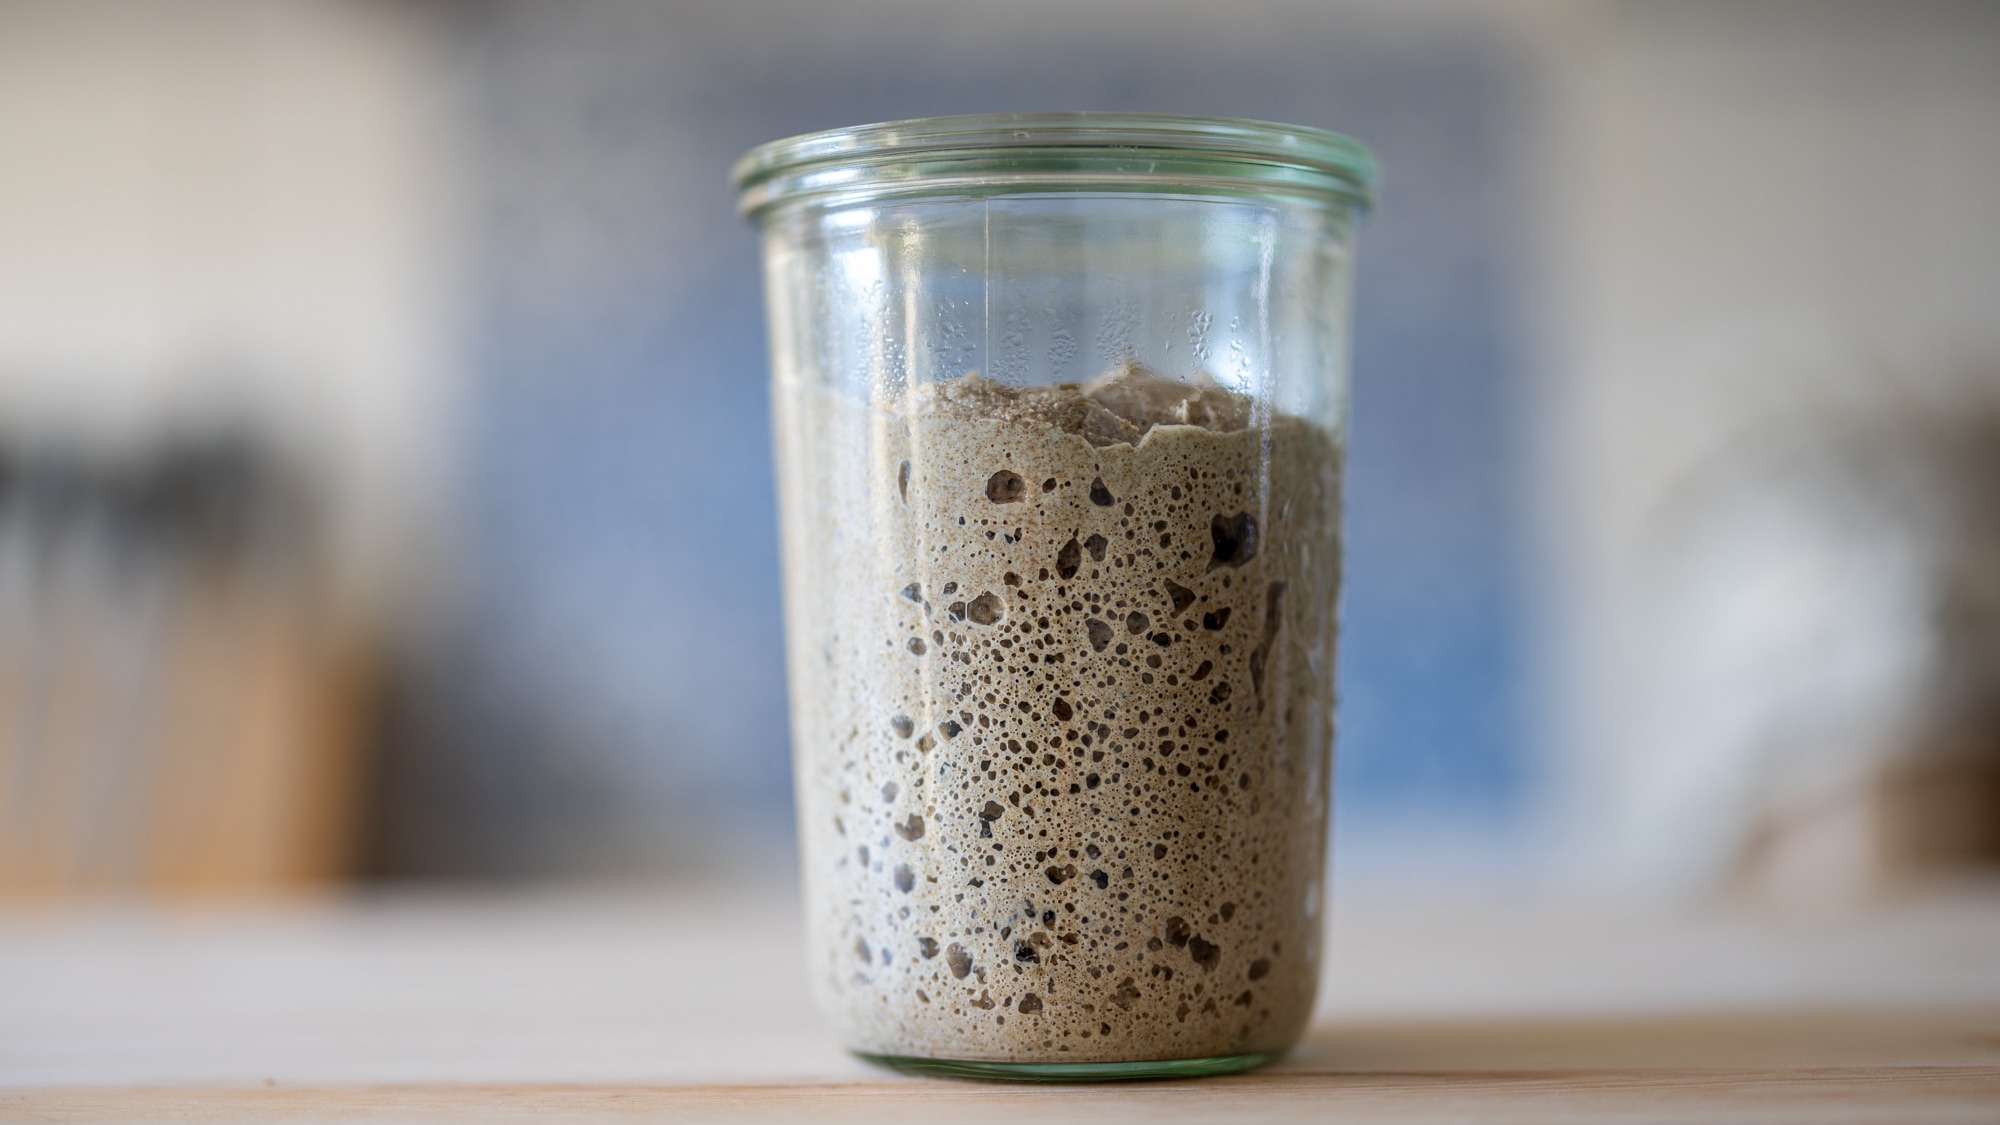
The regular sourdough starter is made at a hydration of around 100 %. This means the starter has equal parts of flour and water. This is the most common and most universal sourdough starter there is. The starter has a good balance of yeast and bacteria. After a feeding, the volume of the dough greatly increases. After it reaches a certain peak, it will start to collapse again.
The best way to judge whether the starter is ready is to look at signs such as air pockets on the edges of your container. Also use the nose to evaluate the smell of your starter. If you feel that the starter doesn’t perform in a desirable way, chances are that your yeast and bacteria ratios are off. In that case frequent daily feedings using a 1:5:5 (starter:flour:water) ratio will help.
A regular starter is a perfect choice to use when utilizing stronger wheat or spelt flours. It also nicely works with rye, emmer or einkorn. If you only have a weak flour at hand with less gluten, this starter might cause issues. As you tend to have quite some bacterial activity, gluten is going to be broken down fast. When using the starter, use around 1 % to 20 % starter based on the flour of your dough.
Depending on the bacteria cultivated, a regular starter either has a lactic (dairy), a vinegary (acetic) or mix of both flavor profiles. You can adjust your starter’s flavor by changing the type to a liquid starter.
4.3 Liquid starter🔗
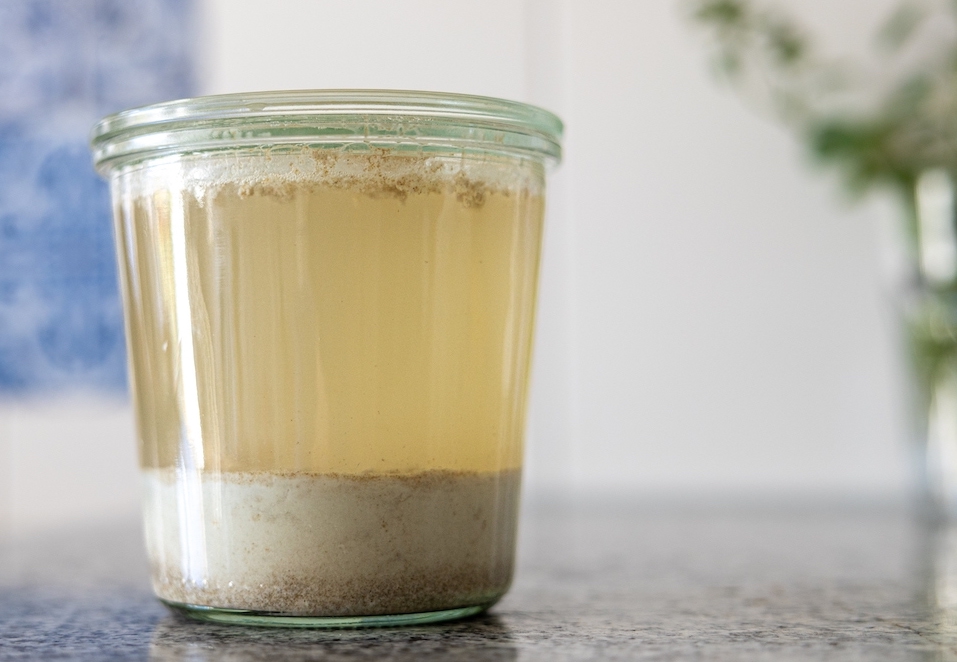
The liquid starter is made at a hydration of around 500 %. This means the starter has much more water than flour. The additional layer of water on top of the flour changes the microbiome of your starter.
By introducing this layer of water, less oxygen is available throughout the course of fermentation. This means that your starter will no longer be producing acetic acid. The heterofermentative lactic acid bacteria will thrive in this environment. This is a neat little trick to change your starter’s flavor profile from vinegary to lactic. Your starter is going to develop dairy creamy notes. Interestingly, when changing the hydration again, your starter is going to maintain the liquid starter flavor profile, but then benefit again from enhanced yeast activity. The liquid starter conversion is irreversible. By changing to a liquid starter you will permanently select a subset of microbes that work better in the more liquid environment. So even after going back to a regular or stiff starter the subset of microbes created by the liquid conversion will remain. For this reason, it is recommended to keep a backup of the starter before the liquid starter conversion.
To begin with the conversion, simply take around 1 g of your starter, mix with 5 g flour and 25 g water. Stir everything together properly. After a few minutes the flour is going to start settling in at the bottom of your jar. Repeat this process over a few days. Shake the starter gently to see if you can see tiny CO bubbles moving in the liquid. This is a good sign that your starter is ready. Use your nose to smell the starter. It should have a creamy dairy flavor note.
As you have more bacterial activity, this starter works best with a very strong flour that can withstand a long fermentation period. Using this starter with a weak wheat flour will not work. If you do not care about baking a freestanding loaf, then you can easily use this starter together with a loaf pan. This starter also works great when making a hearty pancake dough. To use it I shake the starter container until I see all ingredients are homogenized. Then I use around 5 % of it in terms of baker’s math. So for 1000 g of flour that’s around 50 g of liquid starter. As it is very liquid you have to include the 50 g in your liquid calculation. I typically treat the starter directly as liquid in the recipes. So if the recipe calls for 600 g of water and I use 50 g of starter, then I would proceed and only use 550 g of water.
This type of starter is also an excellent mold combatant. As you are removing oxygen from the equation, aerobic mold cannot properly grow. If your starter has a mold problem then the liquid conversion could be the remedy. Take a piece of your starter where you suspect mold growth. Apply the conversion as mentioned before. The mold will likely sporulate as it runs out of food. With each new feeding you are reducing the mold spores. The spores can no longer reactivate as they cannot do so in the anaerobic conditions.
The liquid on top of your starter is an excellent resource that you could use to make sauces. If you feel you would like to add a little bit of acidity, drain the liquid part on your starter and use it. I have used it numerous times to make lacto-fermented hot sauces.
4.4 Stiff starter🔗
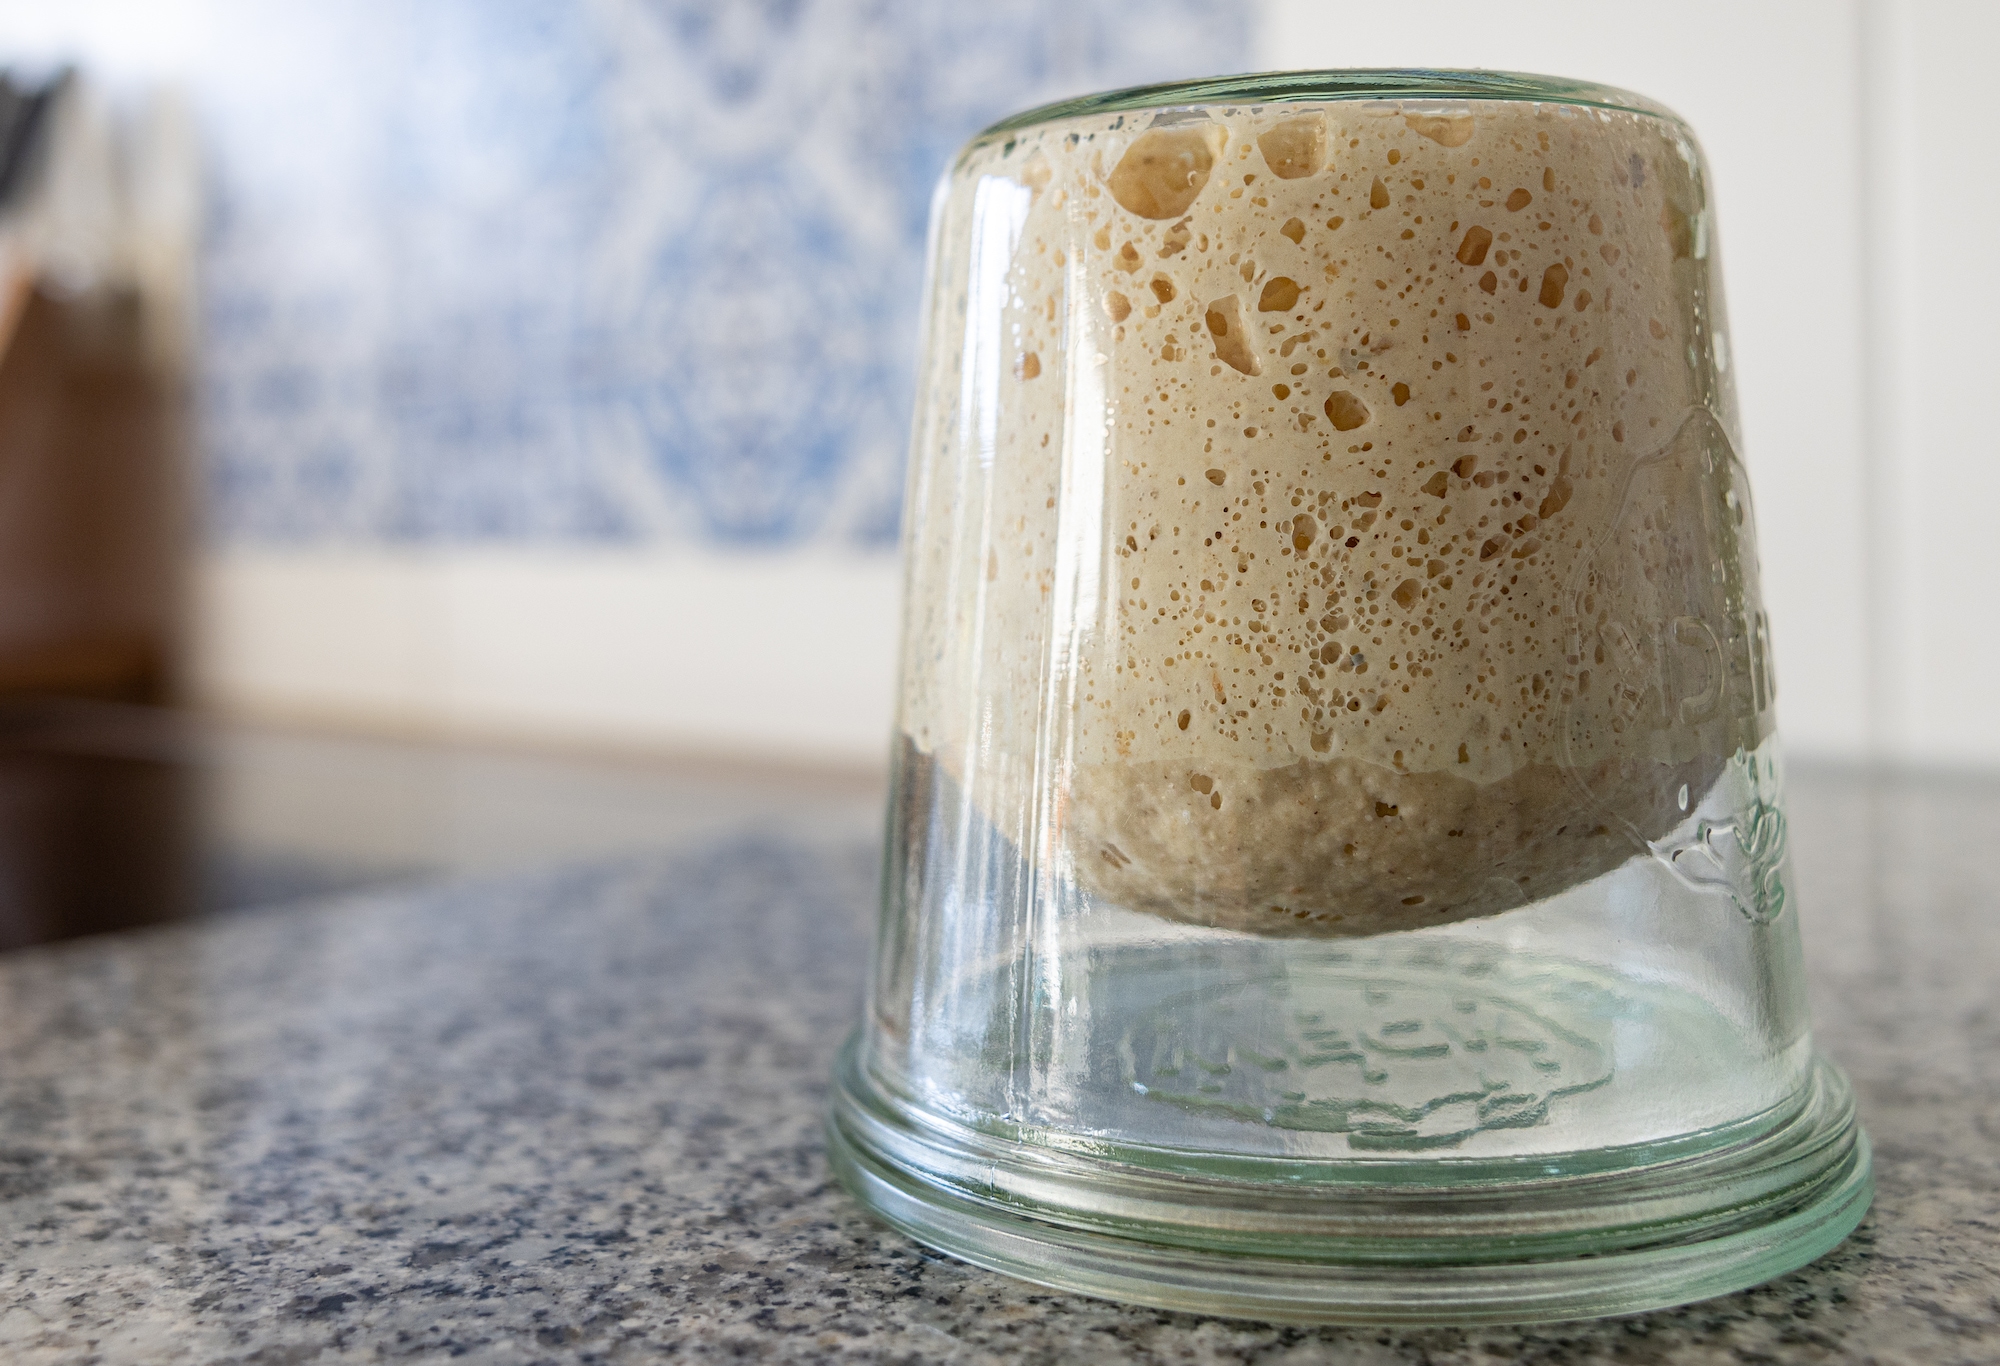
The stiff starter is the driest of all the starters. It has a hydration of around 50 % to 60 %. So for 100 g of flour you are using around 50 g to 60 g of water. If you can’t mix flour and water because the mixture is too dry you need to increase the water quantity. This is often the case when using whole-wheat/rye flour to make your starter. The more bran your flour contains, the more water your flour can absorb. The stiff starter should have a comparable consistency to pasta or pizza dough. When mixing the starter there should be no chunks of flour left. Test placing the starter on your kitchen counter. When lifting it should slightly stick to your counter’s surface. This test indicates that you hydrated the flour sufficiently. When the mixture is too dry, the fermentation speed is greatly reduced and the starter will seem inactive. The starter should be much drier than a regular starter, but also not too dry. Refer to Figure 4.5 for a visual example of the starter’s required hydration level.
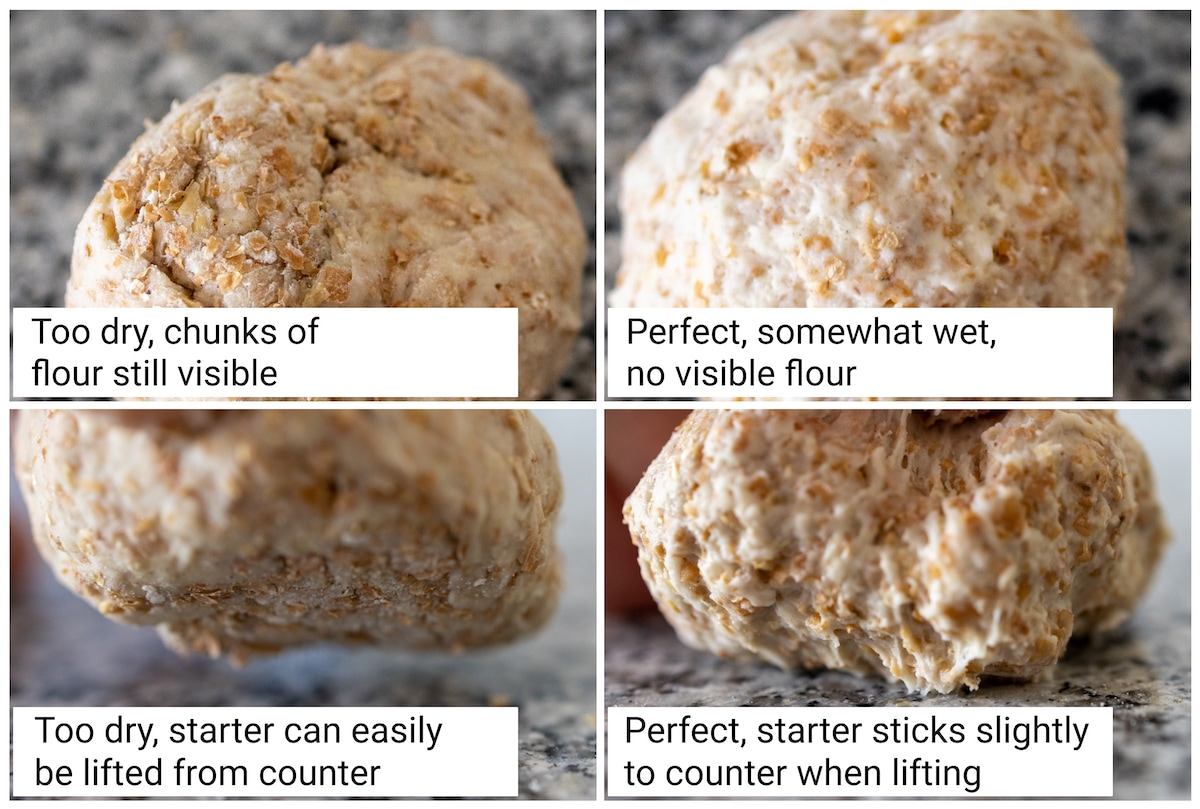
In the stiffer environment the yeast thrives more. This means you will have more CO production and less acid production. In my tests this is a game changer especially if you are using weaker gluten flours. The wheat flours in my home country of Germany tend to be lower in gluten. For wheat to build gluten, warm conditions are preferred [39]. When following recipes from other bakers, I could never achieve similar results. When following timings my doughs would simply collapse and become super sticky. Only when I started to buy more expensive wheat flour my results did start to change. As not everyone can afford these special baking flours and due to their limited availability, I stumbled upon the stiff sourdough starter. I made several tests where I used the same amount of starter and flour. I only changed the hydration between all the starters. I would then proceed and place a balloon on top of each of the jars. The stiff starter jar was clearly inflated the most. The regular starter followed in second place. The liquid starter finished in third place with far less CO production.
I then proceeded and bought a cheap low-gluten cake flour in my nearby supermarket. This flour before had caused me massive headaches in the past. I made a sourdough bread exactly how I would normally do—I had to reduce the hydration a bit as a low gluten flour does not soak up as much water. Then I replaced the starter with the stiff starter. The dough felt amazing and was suddenly able to withstand a much longer fermentation period. The bread had great oven spring and tasted very mild. I am still yet to find a proper scientific explanation why the yeast part of the dough is more active. Maybe it is not. It could also be that the bacteria is inhibited by the lack of water.
When making the stiff sourdough starter, start by using around 50 % water. If you are using a whole-wheat flour, or a strong flour consider going up to 60 %. All the ingredients should mix together very well. There should be no crumbly flour left. This is a common mistake I have seen when people tried to make the stiff starter. Yes it should be dry, but not to a point where it is a brick of cement. If you have ever made a pasta dough, this dough should feel exactly the same.
To evaluate whether your stiff starter is ready, look for a dome. Also look for pockets of air on the sides of your container. Use your nose to smell the starter. It should have a mild smell. It also tends to smell much more alcoholic than the other starters.
When using a stiff starter, use around 1 % to 20 % starter in terms of baker’s math for your dough. This depends on the ripeness of your starter. In summer I typically use around 1 % to 10 % and in winter around 20 %. This way you can also control the fermentation speed. If it is very hot where you live, consider lowering the starter amount to 1 % to 5 %. If it is very cold in your area consider increasing the starter amount up to 30 %. Mixing the stiff starter can be a little bit annoying as it hardly homogenizes with the rest of the dough. In this case, you can try to dissolve the starter in the water you are about to use for your dough. This will make mixing a lot easier.
4.5 Lievito madre or pasta madre🔗
The lievito madre, also known as pasta madre, belongs to the same category as the stiff sourdough starter. After conducting hours of research, I could not find a difference between pasta madre and lievito madre. Both terms seem to be used interchangeably in literature.
In many recipes this starter is made directly from dried or fresh fruits. You can also make a starter from leaves from your garden. As described before, the wild yeast and bacteria consume the glucose from the plants’ leaves. All the options work. When making a starter directly from dried fruits, you sometimes lack the bacterial part of the fermentation. The acidity is very important in order to clean your starter from possible pathogens. If you decide to make your starter from fruits, make sure it also acidifies properly when making a dough. A tool such as a pH meter can be of optimal help. Generally, the lower the pH, the higher the acidity. The acidity should be below 4.2 to know that your starter produces sufficient acidity.
Some bakers cleanse the lievito madre in a bath of water. This is supposed to remove excess acidity. In my own experiments I have not been able to confirm this methodology. The acidity remains the same. The only reason this could make sense is if you also tried to boost anaerobic microorganisms. However, then the starter would need to remain in this environment for quite some time and not just a few hours.
4.6 Conclusion🔗
Baking with sourdough is simple. It’s just flour and water. When seeing a recipe from an experienced baker you wonder, Wait, that’s it? There is nothing more to it? I feel that this might be the reason why some bakers have such complicated feeding procedures. They resort to several feedings per day at a certain given ratio. This makes the baker feel a little more elitist. Of course over time as more and more people follow this procedure, it became a self fulfilling prophecy. The more experienced you become, the higher the chances are that a bogus starter feeding guide will reward you with beautiful results. The reason however is not in the starter routine. The reason is that you understand the fermentation better and become better at reading the signs of your dough.
If I had to choose one starter type I would go for the stiff starter. In many cases it will provide you with consistently great results with little effort. In my experience you can make any yeast-based dough and just replace the yeast directly with the stiff sourdough starter. You will be able to achieve even better results with the stiff starter.
Lastly, no matter which starter type you choose, you can control how sour you want your dough to be. The longer you push the fermentation, the more acidity is going to be piled up. The only difference is that for a given volume increase, the stiff starter will produce the least acidity. So for a volume increase of 100 %, the liquid starter has produced the most acidity, followed by the regular starter and then the stiff starter. If you wait long enough, the stiff starter will have produced the same amount of acidity as the other starters. But before doing so it will have also produced a lot more CO. If you like the sour flavor, you have to push your fermentation longer. This also means you either need to bake in a loaf pan or have a very strong gluten flour that is able to withstand long fermentation times.

